Best Metal Detector Settings for Finding Old Coins
Metal detecting has gotten complicated with all the conflicting advice flying around — forums swearing by one set of numbers, YouTube channels pushing another, and meanwhile you’re walking home with a pocket full of rusted bolts wondering what went wrong. As someone who’s been swinging a detector for going on fourteen years across old farmland permissions in the mid-Atlantic, I learned everything there is to know about why factory settings fail you. And they will fail you. Not because the manufacturers are being lazy — they’re not — but because “general purpose” means optimized for the showroom floor, not for hunting worn nineteenth-century silver in iron-heavy ground.
This guide breaks down the principles behind each critical setting first. Then it applies those principles to two machines most detectorists are actually running right now: the Minelab Equinox 800 and the Garrett AT Pro. Different machine? The principles still transfer. Understanding is the portable part.
The Key Settings for Coin Hunting
Before you touch a single menu option, you need to know what you’re actually changing. I spent my first two full seasons cranking sensitivity to maximum and genuinely couldn’t figure out why I was drowning in false signals. Embarrassing to admit. But it pushed me to actually learn what the controls do instead of just guessing.
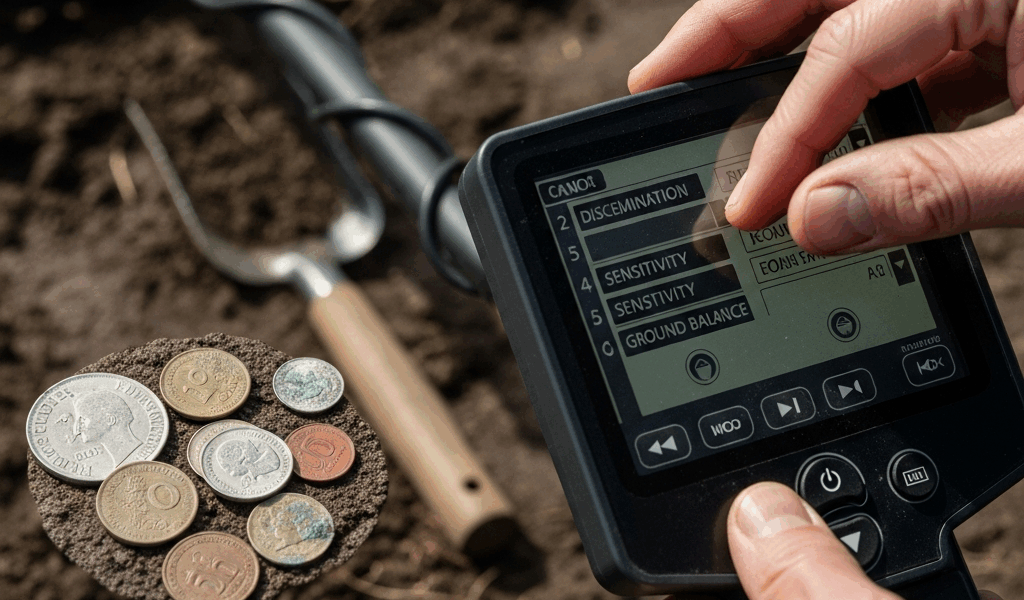
Discrimination
But what is discrimination, exactly? In essence, it’s the setting that tells your machine which target IDs to ignore. But it’s much more than that — it’s also the setting most beginners get catastrophically wrong.
Every metal produces a signal that lands somewhere on a conductivity scale. Most detectors express this as a number — typically 0 to 99 or 0 to 40 depending on the platform. Iron sits low. Zinc pennies (post-1982 US cents) land in the mid-range. Old copper, silver dimes, quarters, and half dollars cluster high, generally in the upper third of whatever scale your machine uses.
The mistake: discriminating out too much. Knock out foil, pull tabs, and nickels to quiet the trash signals — and you’ve also knocked out gold rings, early American coppers, and colonial buttons that share conductivity ranges with exactly the junk you’re avoiding. For pure silver coin hunting on known old sites, a moderate discrimination pattern makes sense. For general hunting? Dig more. Dig everything questionable. A missed Barber dime costs more than the annoyance of a bottlecap.
Sensitivity
Sensitivity controls how deep and how faintly the machine responds to targets. Higher sensitivity, more depth — in theory. In practice, sensitivity has to match the actual ground you’re hunting. Mineralized soil, wet clay, salt water nearby, even power lines overhead all generate background noise. Push sensitivity past what that soil will support and you get false signals constantly — real targets buried inside all that noise.
A practical starting point: run sensitivity at roughly 75% of maximum in moderate ground. Bump it up in small increments until the threshold audio turns chattery and unstable. Then back it off one notch. That’s your working sensitivity for that site — not some number you memorized from a forum post.
Recovery Speed
This one matters enormously in trashy sites and gets almost no attention in beginner content. Recovery speed determines how quickly your detector resets after processing a target signal. Slow recovery is fine in open fields with sparse targets. It’s terrible anywhere littered with iron junk — because when two targets sit close together and your recovery speed is too low, the machine blends the signals and spits out a confused reading that usually registers as iron.
Old homesites, privy sites, colonial-era fields — iron is everywhere in these places. Nails, hardware, farm equipment fragments. Real coin targets hide in the gaps between all of it. Fast recovery speed lets the machine process an iron signal and reset quickly enough to actually catch the coin sitting six inches away. On the Equinox, I run recovery speed at 6 out of 8 for most trashy permissions. On the AT Pro, the analog equivalent is keeping your sweep speed deliberate — not glacially slow, just controlled.
Ground Balance
Mineralized soil — iron oxides, various compounds — responds to electromagnetic fields. Without ground balance, that mineralization registers as a continuous signal, masking real targets under constant background noise. Ground balance tells the machine to ignore the ground’s own response and focus on actual metal.
Pumping the coil — raising and lowering it several inches above ground in a clean area — lets the machine sample the soil and adjust. Do this when you arrive at a new site. Do it again whenever you move to an area that looks geologically different. River bottoms, clay hillsides, and sandy topsoil all balance differently. I once spent twenty minutes on an old farmstead completely baffled by constant false signals near a dried creek bed — heavily mineralized ground, factory balance, every sweep producing garbage. Re-balanced. Found a 1794 large cent within the next twenty minutes. Don’t make my mistake.
Minelab Equinox Coin Settings
The Equinox 800 — street price around $899 at most retailers — is the machine I run on the majority of my permissions now. The multi-frequency technology genuinely produces better target separation on old coins than single-frequency machines in my experience. That’s not marketing talk. That’s several seasons of side-by-side testing on the same sites.
Park 1 vs Park 2 — Choosing Your Base Mode
Park 1 defaults to a recovery speed of 3, designed for lower-trash environments. Park 2 cranks the default to 5 and adds more aggressive iron filtering. For coinshooting in manicured parks, athletic fields, and schoolyards, Park 1 is a reasonable starting point. For any site with visible iron trash — fence lines, old foundations, plowed agricultural land — start in Park 2.
Field 2 is honestly underrated for old coin hunting on farmland. Worth experimenting with if the Park modes aren’t satisfying you on agricultural permissions.
Discrimination Pattern for Coins
Probably should have opened with this section, honestly — this single pattern change accounts for more of my silver finds than any other adjustment I’ve ever made.
The Equinox uses a notch discrimination system where you accept or reject individual target ID numbers across the full 1–40 scale. Here’s what I use on known colonial or 19th-century sites:
- Reject IDs 1–6 (most ferrous junk)
- Accept 7–9 (borderline iron, but old buttons and certain artifacts land here)
- Reject 10–12 (heavy iron range — square nails, hardware)
- Accept 13 through 40
That gap from 10–12 is the only additional notch I cut. Everything from 13 to 40 stays open. Nickels land around 12–13. Old silver three-cent pieces hit the mid-teens. Mercury dimes typically read 27–29. Washington quarters come in around 36–37. Seated Liberty half dollars push toward 40.
Iron Bias
Iron bias — accessible in Equinox settings as IB 0 through 9 — controls how aggressively the machine interprets ambiguous ferrous signals. Higher iron bias means the machine leans toward calling questionable signals iron. Lower means it leans non-ferrous.
I run iron bias at 0 on sites where I know old coins are present. I’d rather dig extra nails than walk past a hammered silver. On heavily modern-trashy sites with no real historical value, I’ll bump it to 3 or 4 just to manage fatigue. Iron bias at 6 or above loses old coins — tested it deliberately in my test garden. Buried a worn 1883 V-nickel and a flat button at 6 inches. Iron bias set to 7, and the machine called both of them iron.
Sensitivity on the Equinox
Running sensitivity at 20–22 out of 25 works well in moderate soil. In hot ground, I’ll drop to 17–18. The machine tells you when you’ve pushed too high — threshold audio gets unstable, target IDs start jumping erratically on things that aren’t targets. Listen to it.
Garrett AT Pro Coin Settings
The AT Pro — around $599 retail, sometimes less refurbished — runs at 15 kHz on a single frequency. It’s been a workhorse in this hobby for well over a decade, and it’s fully waterproof to ten feet, which matters when you’re hunting creek beds and shallow wading situations where a surprising number of old coins turn up. I ran an AT Pro as my primary machine for five years before moving to the Equinox. Knew it well.
Setting Up a Custom Program
The AT Pro has three preset modes — Standard, Pro, and a customizable option. Get out of Standard immediately. Standard exists for demonstration ease, not field performance. Use Pro mode or build a custom pattern. Pro mode is what gives you access to iron audio, which is critical.
To build a custom coin program on the AT Pro:
- Start in All Metal mode and sweep your site to get a read on what signals you’re actually dealing with
- Switch to Pro mode
- Set sensitivity to 70–75 (out of 99)
- Enable iron audio — the small speaker icon in Pro mode
- Set your discrimination pattern as described below
Discrimination Pattern for US Coins
The AT Pro uses a 0–99 target ID scale. The relevant ranges for common US coins shake out roughly like this:
- Indian Head pennies — 75–82
- Wheat pennies — 80–85
- Buffalo nickels — 55–65
- Mercury dimes — 82–87
- Barber quarters — 86–90
- Morgan silver dollars — 87–92
Iron nails land heavily from 0–40, with larger iron occasionally pushing into the 50s. I set a discrimination floor at 40 for most coinshooting situations. On sites where early coins or artifacts with variable conductivity might be present, I’ll drop that floor to 30 — accepting more iron signals in exchange for more complete coverage. Worth the extra digging.
Notch out 46–54 if you’re on a site hammered with bottlecaps. They congregate right there. You’ll miss some targets, but you’ll also recover your sanity.
Iron Audio
Iron audio on the AT Pro produces a low grunt when the machine detects a ferrous signal — even within your accepted discrimination range. More useful than it sounds. Wrapped coins — silver sitting directly against iron — can produce mixed signals that read mid-range without iron audio. With iron audio on, you hear both the coin tone and the iron grunt simultaneously. That combination tells you to slow down, overlap your sweeps, and work the target from multiple angles before you decide whether to dig.
Frustrated by constant iron masking on a permission near an old Civil War-era homestead, I started relying heavily on iron audio to identify these masked targets — and pulled eleven coins in a single afternoon that I’d apparently walked right over on a previous hunt in Standard mode. The site hadn’t changed. The settings had. That’s what makes iron audio endearing to us AT Pro hunters who work trashy historical sites.
Ground Balance on the AT Pro
The AT Pro offers automatic, manual, and pumping ground balance. Use the pumping method — hold the coil 10–12 inches above the ground, press and hold the ground balance button, pump the coil down to about 2 inches and back up repeatedly while the machine adjusts. Wait until it stabilizes. Don’t rush it. Rushed ground balance is barely better than no ground balance.
How to Adjust for Your Specific Site
The settings above are starting points. Every site is its own puzzle, and reading the site — making real-time adjustments based on what the ground is telling you — is where experience actually pays off. That skill isn’t something any guide can hand you. But here’s how it breaks down across common environments.
Public Parks
Parks have layers. The surface layer is modern trash — clad coins, pull tabs, zinc pennies, bottlecaps by the dozen. Drop below six inches and you start finding older material, particularly in parks that predate mid-century landscaping. High trash levels mean bumping recovery speed up and being aggressive with discrimination — but do a small test area in All Metal first to actually understand the trash composition before you start notching things out.
In most public parks, sensitivity in the 18–20 range on the Equinox or 65–70 on the AT Pro works without generating excessive chatter from buried utilities and fencing.
Farm Fields
Agricultural ground is where old coins turn up in the greatest numbers. It’s also the most variable environment. Freshly plowed fields break up target depth — a coin sitting at 8 inches is now at 4 after a deep plow cycle. Sensitivity can go higher after plowing. Ground balance needs a fresh pump at every single session, because plowing turns over mineralized layers that weren’t at the surface before.
Iron in farm fields is predominantly agricultural debris — plow points, harness hardware, wire fragments. It concentrates near fence lines and barn foundations. Sweep those areas slowly with maximum recovery speed. Run lower discrimination than you think you need. Old coins love those same concentrations.
Beach Hunting
Salt water wet sand is a special case. Salt is conductive — it mimics metal signals and wrecks ground balance calibrations set for inland soil. Most machines have a dedicated beach mode. Use it.
On the Equinox, Beach 1 handles dry sand and Beach 2 handles wet salt sand. The multi-frequency operation manages salt beach conditions better than any single-frequency machine I’ve run. On the AT Pro, the machine handles wet salt beach but runs noisier — drop sensitivity to 60 or below and re-ground-balance constantly as you move between wet and dry zones.
Old coins on beaches — colonial-era trade silver and Spanish reales in particular, especially along the southeastern US coast — tend to run deep. Prioritize depth over discrimination at the beach. Run lower discrimination and dig more targets.
Adjusting Mid-Hunt
The adjustment I make most often in the field is sensitivity. Ground changes as you move across a site — a dry hilltop hunts completely differently than the low ground near a water source. Carry a mental baseline of what normal threshold audio sounds like for your current settings. When the machine starts chattering without obvious cause, drop sensitivity two notches and see if it settles. If it does, the ground changed. If it doesn’t, check for power lines, buried irrigation pipe, or simply a large buried target.
Recovery speed is the second adjustment. Moving from an open section of a site into an obvious concentration zone — cellar holes, middens, privy areas — means bumping recovery speed up immediately. Dense target areas demand faster reset times. Signals start sounding crisper. Tones on adjacent targets become more separated and reliable.
There’s no universal perfect setting — probably should have opened with that, honestly. The detectorists filling their finds pouches treat their machine as a tool to be tuned continuously, not a gadget to switch on and sweep mindlessly. Learn what your machine sounds like when it’s actually working well, and you’ll know the moment something’s off. That awareness — more than any specific number on any specific menu — is what actually puts old coins in your hand.


Stay in the loop
Get the latest collectors coin corner updates delivered to your inbox.